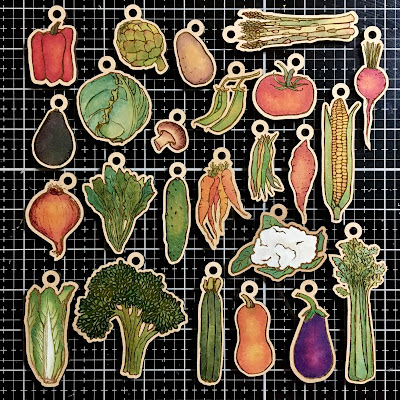
Sunday, May 6, 2012

Come into My Garden

I made this project using the shirt stencil I talked about here. This time, I cut the stencil out of acetate (an overhead transparency) so that I can wash it off.  The stamps are from Blockheads Stamps, which inspired me to use the embossed resist technique with their technique challenge (see below). I like the results so much, I also entered them into the Stamp Man's Favorite Technique Challenge. My favorite technique definitely has to do with sponging with stencils.
Come into My Garden
I used two Calendula stamps for this card, the full plant on the frame, and a single flower for the shirt. I used Justrite Stampers (retired) font system to write "come into my," and added the word Garden from this Blockheads set (I should have gotten the bigger bunch of tulips! Next time...)

I stamped the single flower through the stencil and embossed the image with clear embossing powder. I replaced the stencil and sponged (and brushed) ink to reveal the flowers. I did the same with the collar, and then added the small neck piece.
Come into My Garden Detail

Then I fiddled around for two days until I found a way to display it that I liked. I like the coordinated images of the Calendula playing different roles in the design. I also like the sentiment. I think it's more amiable than shirty though, don't you?

Thanks for looking!
I will add this card to the Blockheads Embossed Technique challenge and blog hop. Here's the hop. Add your link to play.

Saturday, May 5, 2012

Shirt Tag

I drew a Hawaiian Shirt (two days after the challenge that inspired me was over) and made a stencil. Then I used the embossed resist technique to decorate it with white flowers. The stamp is from Inkadinkado.
Hawaiian Shirt Tag
I'm going to make a few more shirts, but I was happy enough with this first go to show it off. I love to sponge through stencils. Fabric seems to come out extremely well with this technique. In addition to this shirt, I've also made an apron and a dress.

This shirt is actually three stencils. Here are the outlines:
Shirt stencils
If you want to use my stencils to make your own wardrobe, and have a cutter that can cut from an Adobe Illustrator file, I'd be happy to share. Shoot me a message.
Thanks for looking!

Monday, April 30, 2012

Can you dig it? Yes I can!

I bought two sets of stamps from Flourishes recently, so I thought I'd participate in their challenge. In this card, I used the From the Garden set, and managed to thoroughly embed the voices from the band Chicago in my head.
Can You Dig It?
This Timeless Tuesday Challenge was a bingo challenge. Participants choose a row, column or diagonal and include all three elements in a card.
I chose the last column: bling, die cut and emboss. I stamped the images on white card stock, and colored them in using my Copics.  I used the Spellbinders' Classic Circle and Parisian Accent dies to cut out and frame the images.  I also paper pieced the gloves, adding a little shading with my Copics.  the bling is from Recollections (Michael's). I stitched around the edge in tight green zig-zags to give my border a finished look.
Can You Dig It? Detail
Thanks for looking!

Saturday, April 28, 2012

Remember when

Remember when life was simple? I'm not sure I do. When you look at these images, please click on them, to see them without the greenish background on my blog.
I made this card for the Crafty Girl's Challenge #2, use two die cuts. I rarely use fewer than two die cuts, so this restraint was not very challenging!
Remember When
I used a stamp from Heartfelt Creations Mystic Hideaway for the focal. I colored it with my Copic markers, using light pink and warm grays, and then added some texture with my Prismacolor pencils. I framed the image with two dies from Spellbinders' Fleur de Lis Squares, cutting away the center of the inside square with a die from Classic Squares. I love the way the vines on the trellis around the image peek out around the frame. I stitched a piece of patterned paper, which coordinates amazingly well with this image, from a set I bought years ago called Girls to Women, from Busy Scrapper's Solution to a piece of brown card stock for the base.

I stamped the sentiment with Justrite Stamper's soon to be discontinued Old Friend set, and then cut it out with the smallest die from the Lacy Circles Spellbinders' die. The frame on the stamp fits just outside the embossed region on that die cut, giving the edge an even lacier texture.
Remember When Detail
I love this card so much, I'm going to share it on the Simon Says Stamp! Anything Goes Challenge page as well. Thanks for looking!

Here comes the sun!

This frustrating pop out card took me three tries to excecute, and I'm still not entirely happy with it. I am moving on, though. I learned many things about designing these flip cards, and I'm going to try again now with a simple circle and my new Flourishes stamps. For today, here comes the sun!
Here Comes the Sun
I used a Spellbinder die for the sun, and some unlabeled tiny letter stamps, but I drew the clouds myself and cut them out on my Silhouette cutter. I'm submitting this one to the Simon Says Stamp! Anything Goes challenge. Have a sunny day!